A deceptively easy cake that requires no frosting, but is still a showstopper for a special occasion

Upside down cakes are seriously underrated, in my opinion. Baked in a single tin, requiring no frosting but a simple dollop of fresh cream on the side, this cake is perfect for a special occasion.
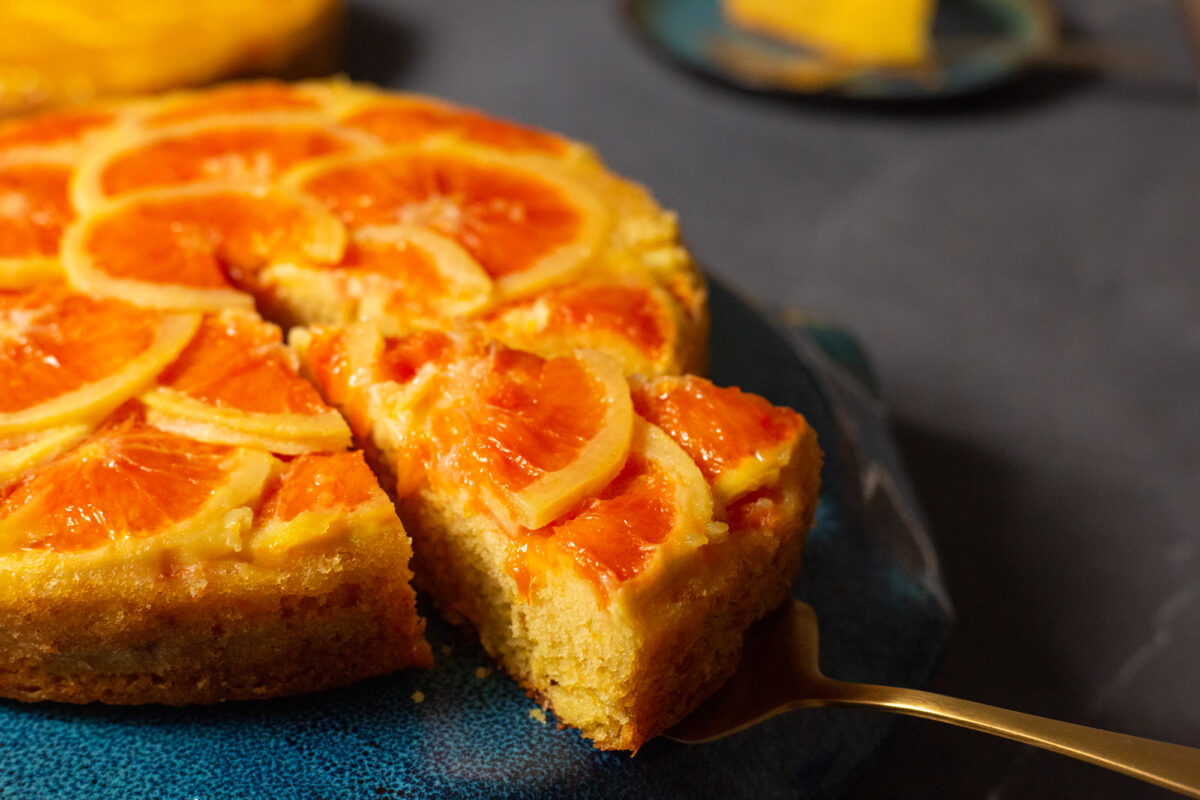
I have recipe tested this with several different types of citrus. The one that by far, looks the prettiest is made with blood/cara cara oranges. Grapefruit, I found, is quite too bitter even with the sugar syrup. If you cannot find cara cara oranges, navel oranges will work just as well. Mandarins however, fall apart far too easily.
The cake that I have baked has a lovely hint of citrus as well, due to both the orange juice and rind in the recipe. The yogurt adds a level of moistness and ensures that the cake keeps for a few days. The cake has a bit more density than some of my other cakes, but that is needed to support the oranges. I have still managed to keep the moisture however by the inclusion of oil in the sponge.

Whilst a dollop of whipped cream on the side is a perfect pairing for this citrusy sponge, mixing some yogurt with icing sugar is also a lovely alternative. It is slightly tangy and cuts the sweetness of the cake. The next time you are looking to bake a celebration cake, perhaps try this for a more unconventional alternative.
If you make this recipe, please share it with me by tagging me on Instagram @adventureswithsugar or on Facebook at Adventures with Sugar.
WHAT SHOULD I KNOW ABOUT MAKING THIS RECIPE?
- This recipe works best with cara cara/blood oranges, but can also be made with navel oranges. Using grapefruit produces quite a bitter undertone which I did not personally enjoy. Using mandarins tend to fall apart and look less pretty.
- Make sure the oranges fully cover the base and overlap. Any gaps will result in the cake peeking through and the design will look less pretty.
- Make sure to let the cake cool completely before upturning it. If you do this whilst warm the cake can fall apart.
SYRUP AND TOPPING
- 45g butter, melted
- 45ml citrus juice
- 100g caster sugar
- 4 medium size cara cara oranges, navel oranges or blood oranges
METHOD
- Grease and line the bottom and sides of a 23cm round spring-form tin with baking paper. Set aside. For extra safety, wrap the outside in foil in case the syrup leaks out the tin. Then place the tin on a larger cake pan.
- Brush the melted butter on the sides and base of the cake pan.
- Mix together the juice and caster sugar and spread over the bottom of the pan.
- Thinly slice your oranges into rounds. I find this easiest to do with a sharp serrated knife. Slice off the skin of the oranges to remove the bitterness, if you prefer. I do not mind the bitterness and it enhances the marmalade-feel.
- To arrange the oranges, I find it easiest to arrange the slices as you want the final product to look, then flip over so that the reverse pattern is displayed in the tin. That way when you up-turn the final product, the arrangement will be the correct way around.
- Arrange your oranges on the base of your tin. Make sure the base is fully covered with the oranges. If not, the sponge will peak through the orange topping and not look as pretty.
CAKE
- 120g butter, melted
- 120ml oil
- 250g sugar
- 2 Tbs orange rind
- 3 large eggs
- 240g cake flour
- 20g cornflour
- 1 tsp bicarbonate of soda
- 1 1/2 tsp baking powder
- 1/2 tsp salt
- 125ml orange juice, freshly squeezed
- 120g full fat yogurt
- 1 tsp vanilla essence
METHOD
- Preheat your oven to 180 degrees Celcius.
- Sift the flour, cornflour, baking powder, bicarbonate of soda and salt in a separate bowl and set aside.
- Mix the yogurt, orange juice and vanilla essence together and set aside.
- Cream the butter, oil, sugar and orange rind until the mixture is pale and slightly fluffy. This should take about 3 minutes.
- Add the eggs, one at a time adding the next after the previous egg is fully incorporated.
- Following the eggs, begin with the flour mixture and alternate with yogurt mixture. The flour mixture will be incorporated in three batches and the yogurt mixture in two parts.
- Spoon the mixture carefully into the cake tin, on top of the oranges. Be careful not to displace the oranges. Level out the cake batter.
- Bake for around 40 minutes, or until a skewer inserted comes out clean, with no crumbs on it.
- Let the cake cool in the tin completely, before turning out. If you turn the cake out whilst the cake is still warm, the oranges on the top could cause the cake to fall apart.

Recipe by adventureswithsugar.com


1 Comment
Orange Cream Chiffon Cake – Adventures with Sugar
27 June, 2022 at 9:06 pm[…] cakes are no stranger to me. When in the heart of winter, this blood orange upside down cake is simple but effective as a weekend dessert, served with a dollop of whipped cream. If you want to […]